How to Create Custom Design Products and Add Them to Your Store
Introduction
Branded merchandise is one of the easiest ways for supporters to show they care, and every sale can raise money for your cause. With Donor360's Design your own flow, you start from a blank product (t-shirts, hoodies, tumblers, tote bags and more), add your own text, clipart or artwork, set a selling price, and then add the approved product to any of your stores.
The whole process has two parts:
Part 1 – Create the product in Products using the 4-stage builder: Design, Feature Image, Pricing, Finish.
Part 2 – Add it to a store in Stores once an admin has approved the design.
Before you start
A Donor360 account with access to Products and Stores in the left menu.
At least one store already set up (or create one with Stores → Add New Store).
Your artwork, if you plan to upload it: PNG or JPG, ideally 1500 × 1500 px with a transparent background. Original vector artwork gives the best print results.
Only upload artwork you have the legal right to reproduce and sell.
Part 1 – Create a custom design product
Step 1: Open Products and click Add New Product
From the left menu, select Products. You'll see your catalog with Active, Archive and Pending tabs. Click the green Add New Product button in the top-right corner.
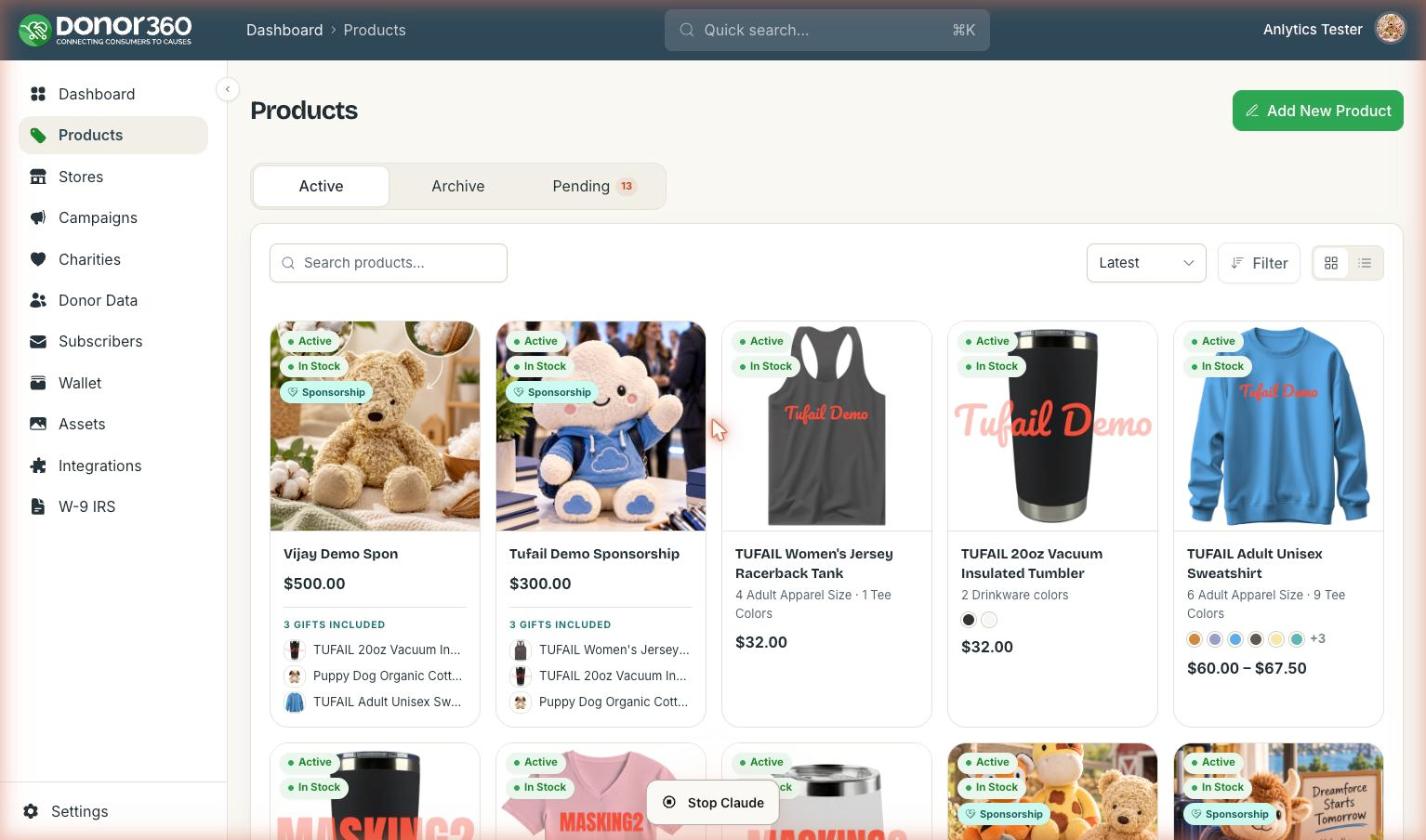
Screenshot 1 – The Products page with the Add New Product button.
Step 2: Choose "Design your own"
A pop-up asks how you want to add to your catalog. Pick Design your own and click Design products.
(The other options are Add ready-made for catalog items you sell as-is, and Start a sponsorship for donation-based offers.)

Screenshot 2 – The Add a product dialog. Choose Design products.
Step 3: Pick one or more blanks
On the Pick a blank to design page, browse or search the blank products. Use the Categories list on the left (e.g. Adult UNISEX T-shirts, Drinkware, Tote Bags) to narrow things down.
Click the + icon on a product card to select it. Selected blanks appear in the Selected products panel on the right. You can select several blanks to design them in one go. Then click Continue to design.

Screenshot 3 – A blank selected and listed in the Selected products panel.
Step 4: Design your artwork in the Design Studio
The Design Studio opens on stage 1 Design. Here's what you'll find:
Left panel – the blanks you're designing and their Colours. All colours are selected by default; click a swatch to deselect colours you don't want to offer.
Front / Back toggle – choose which side to print. Each printed side adds a print cost (shown under the button).
Printable area – the dotted box on the product. Keep your design inside it.
Running cost (top-right) – updates live as you add printed sides.

Screenshot 4 – The Design Studio with the printable area, colours and running cost.
Step 4a: Add text
Open the Text tab, type your text and click Add. You can then style it with Presets (Straight, Badge, Rainbow, Stamp, Wavy), choose a Font, apply a Curve (Arc, Circle, Wave, Spiral) and adjust the Style. Drag the handles on the canvas to move, resize or rotate it.

Screenshot 5 – Text added to the front, with style options and the Layers list.
Step 4b: Add clipart or upload your own artwork
Clipart – search the built-in icon library and click any icon to place it.
Upload – click + Asset to upload your logo or artwork (PNG/JPG, 1500 × 1500 px transparent preferred). Each element you add appears under Layers, where you can select it to edit.

Screenshot 6 – The Upload tab with file guidelines.
Design tips: create contrast (avoid dark ink on dark fabric); use 1–3 colours and print on one side to keep costs down and raise more per sale; offer 1–2 product colours that complement your design. Use Save Artwork to save progress, then click Save & Continue.
Step 5: Pick the feature image
Donor360 generates a mockup for every colour you kept. Wait a few seconds for the photos to finish preparing, then click the image shoppers should see first on your storefront – it gets the Featured badge. Click Continue to pricing.

Screenshot 7 – Generated mockups; the selected one becomes the featured image.
Step 6: Set the product title and selling price
Enter a Product title (required) and your Selling price. The table shows exactly how the money works:
Blank cost – cost of the plain product from the manufacturer.
Print cost – per printed side.
Your raise – selling price minus total cost. All of it goes to the cause.
Donation to charity – the base donation plus your raise.
Click Submit for Approval.

Screenshot 8 – Pricing: a $60 selling price adds a $10 raise, for a $25 donation.
Step 7: Wait for approval
You'll see Design submitted for approval. An admin reviews every design before it appears in your catalog. Track it under Products → Pending; if a design is rejected, you can revise and resubmit it from there. Once approved, it moves to the Active tab.

Screenshot 9 – The new design in the Pending tab, marked Pending approval.
Once approved, the product shows in Products → Active with the Active and In Stock badges. The price range (e.g. $60.00 – $67.50) reflects size-based pricing for larger sizes.

Screenshot 10 – The approved Donor360 Demo Sweatshirt in the Active tab.
Part 2 – Add the product to your store
Step 8: Open your store
From the left menu, select Stores. Click the three-dot menu on the store card and choose Edit (or click the store card).

Screenshot 11 – Stores list; open the store with the three-dot menu → Edit.
Step 9: Go to the store's Products tab and click Manage Products
Inside the store, open the Products tab. It shows everything currently on the store. Click + Manage Products.
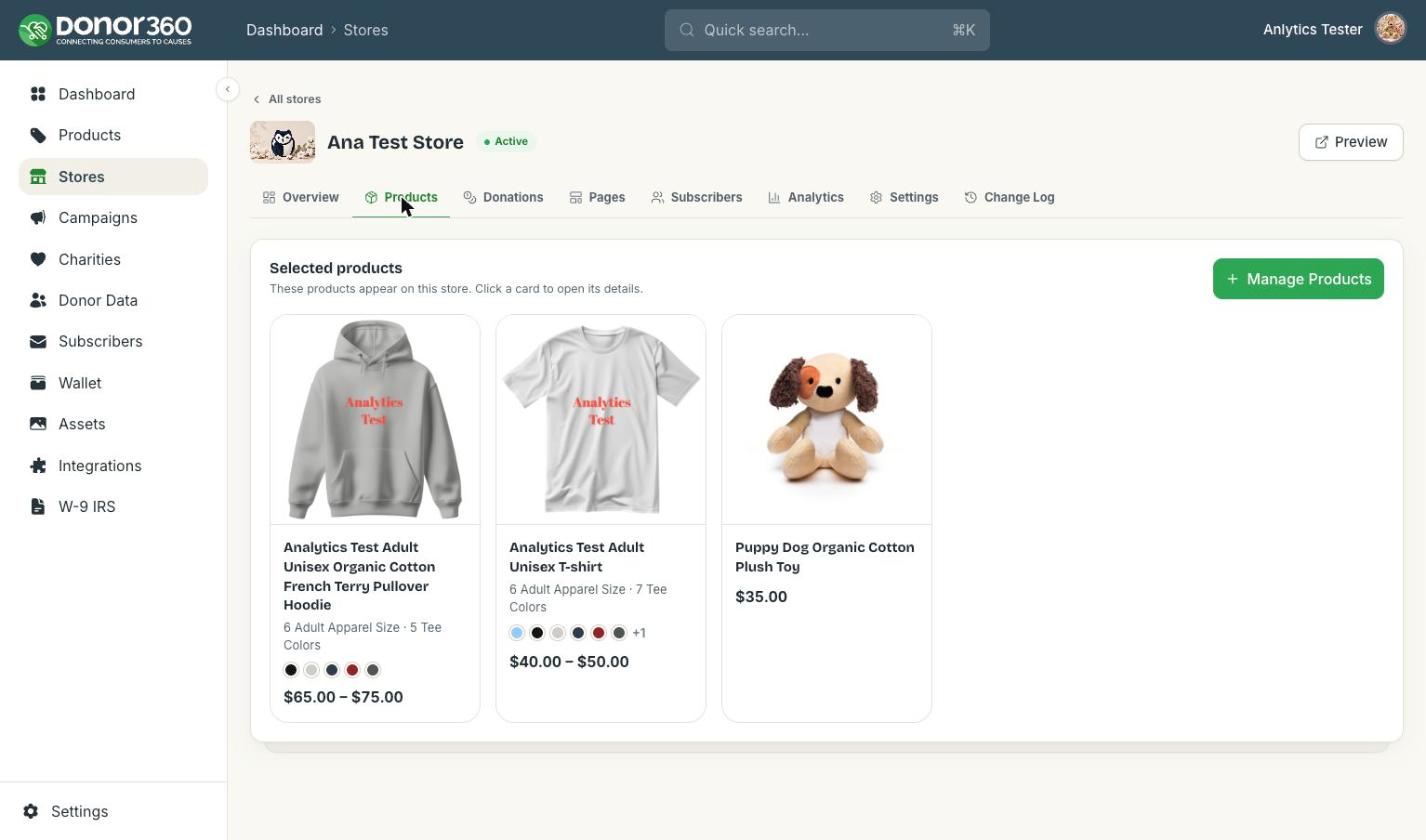
Screenshot 12 – The store's Products tab.
Step 10: Select your design product
Your approved catalog products are listed with filters for All, Customizables, Consumables and Sponsorships. Open Customizables to find design products quickly (or use search). Click the circle on your new product's card (here, Donor360 Demo Sweatshirt) to select it – it's added to the Selected panel on the right, which is exactly what shoppers will see. Use the × next to any item to remove it.

Screenshot 13 – The Donor360 Demo Sweatshirt selected and added to the Selected panel.
Step 11: Save & Publish Updates
Click Save & Publish Updates. A Products updated confirmation appears and the store's Products tab now shows your new product. Click Preview (top-right) to see it on your live store.

Screenshot 14 – The Donor360 Demo Sweatshirt is now live on the store.
Troubleshooting & FAQ
Why can't I find my new design in Manage Products?
Only approved products can be added to a store. Check Products → Pending; it'll appear once an admin approves it.
The Continue to pricing button is disabled.
Mockups are still being generated. Wait a few seconds until all images load, then pick a featured image.
Submit for Approval is greyed out.
Every product needs a title. Enter a Product title for each item.
My design was rejected.
Open it from the Pending tab, make the requested changes and resubmit.
How do I raise more for my cause?
Increase the selling price above the cost – 100% of the raise goes to the cause. Printing on one side also keeps costs lower.
Quick checklist
☐ Products → Add New Product → Design your own
☐ Select blank(s) → Continue to design
☐ Choose colours, add text / clipart / artwork inside the printable area → Save & Continue
☐ Pick the featured image → Continue to pricing
☐ Enter title and selling price → Submit for Approval
☐ Wait for approval (Products → Pending → Active)
☐ Stores → your store → Products → Manage Products
☐ Select the product → Save & Publish Updates → Preview
Post by:
Team Donor360